Showing posts with label pattern. Show all posts

Wednesday, June 28, 2023

Futurama is for Squares - Planet Express Crew Graphs

Good News, Everyone!

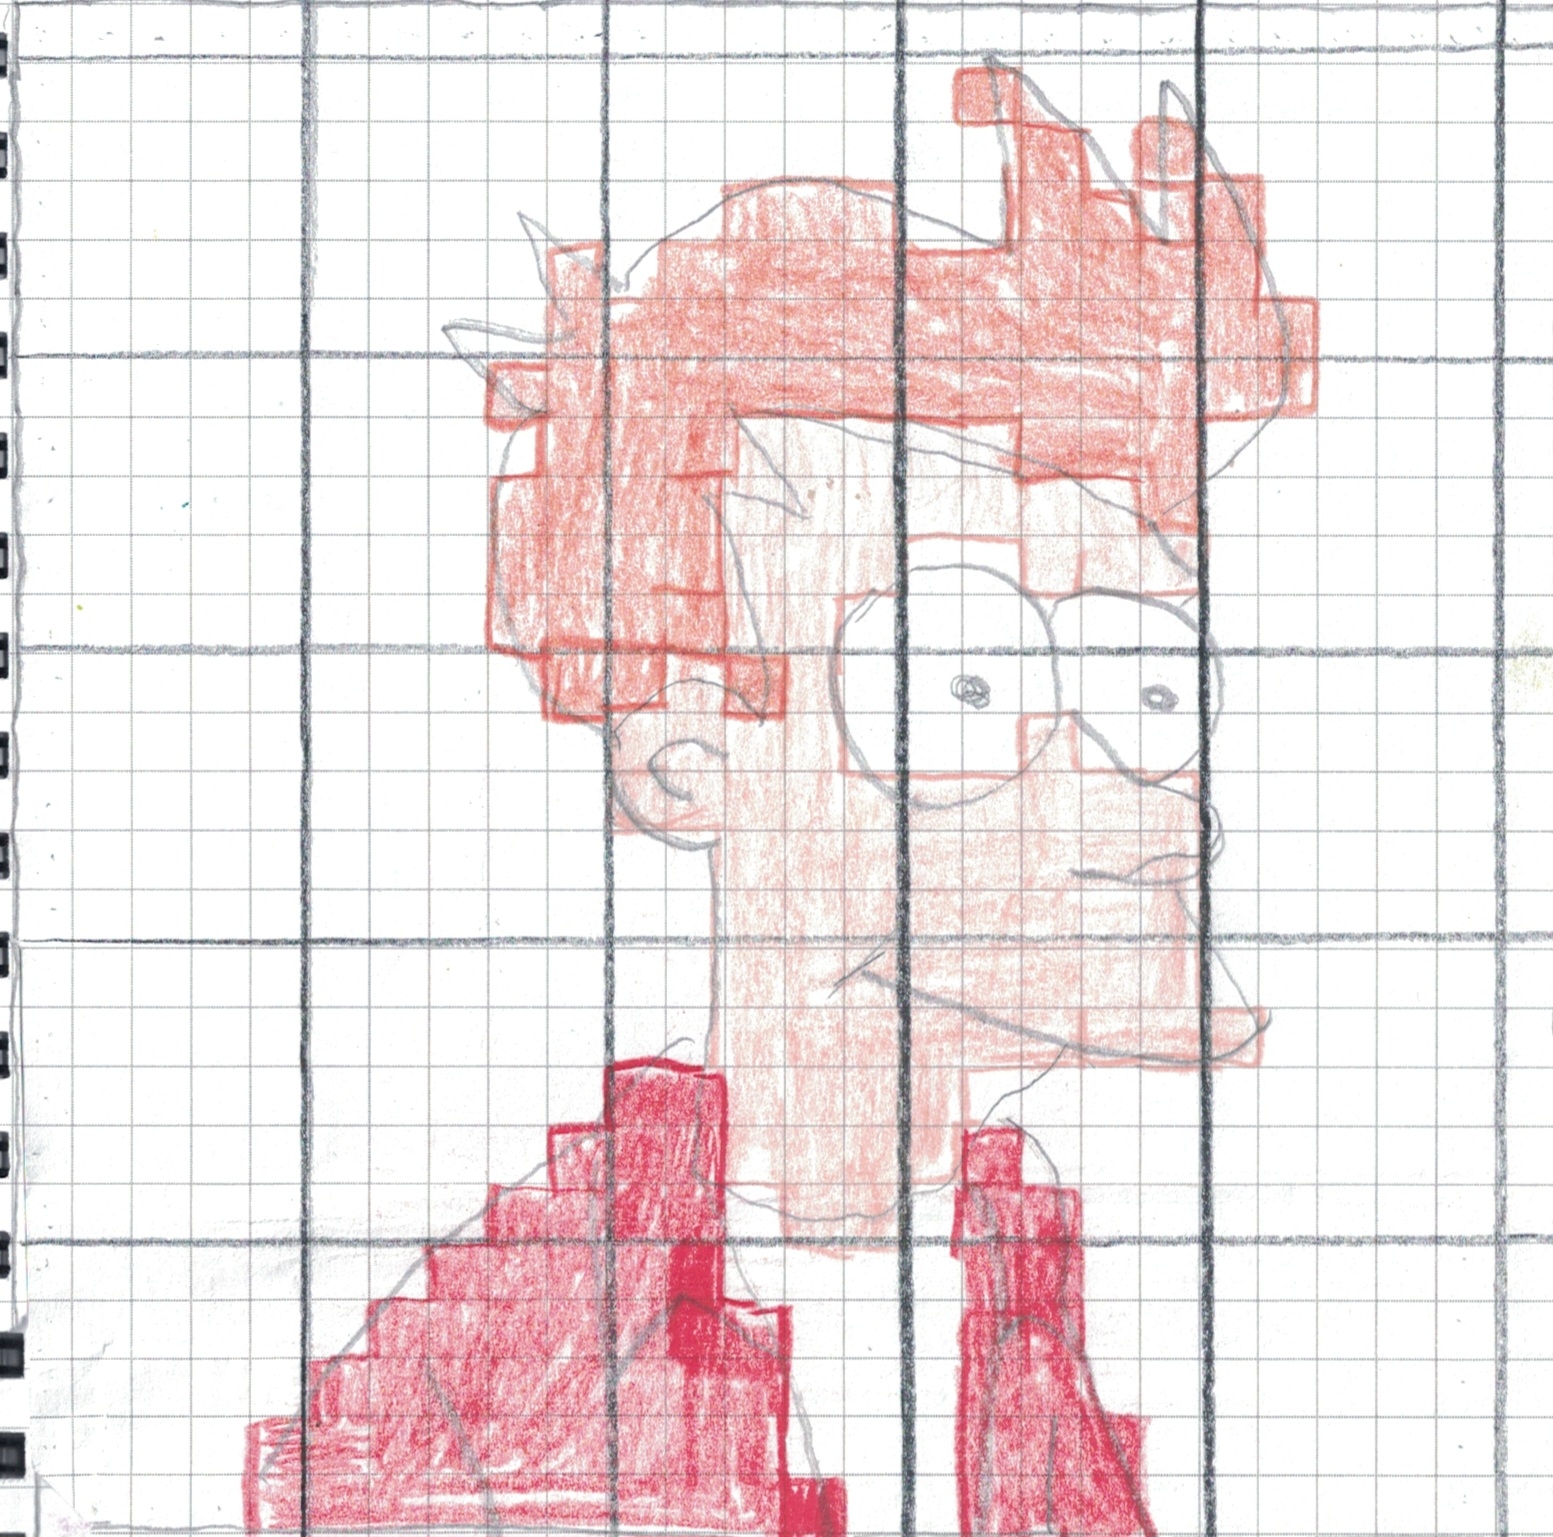
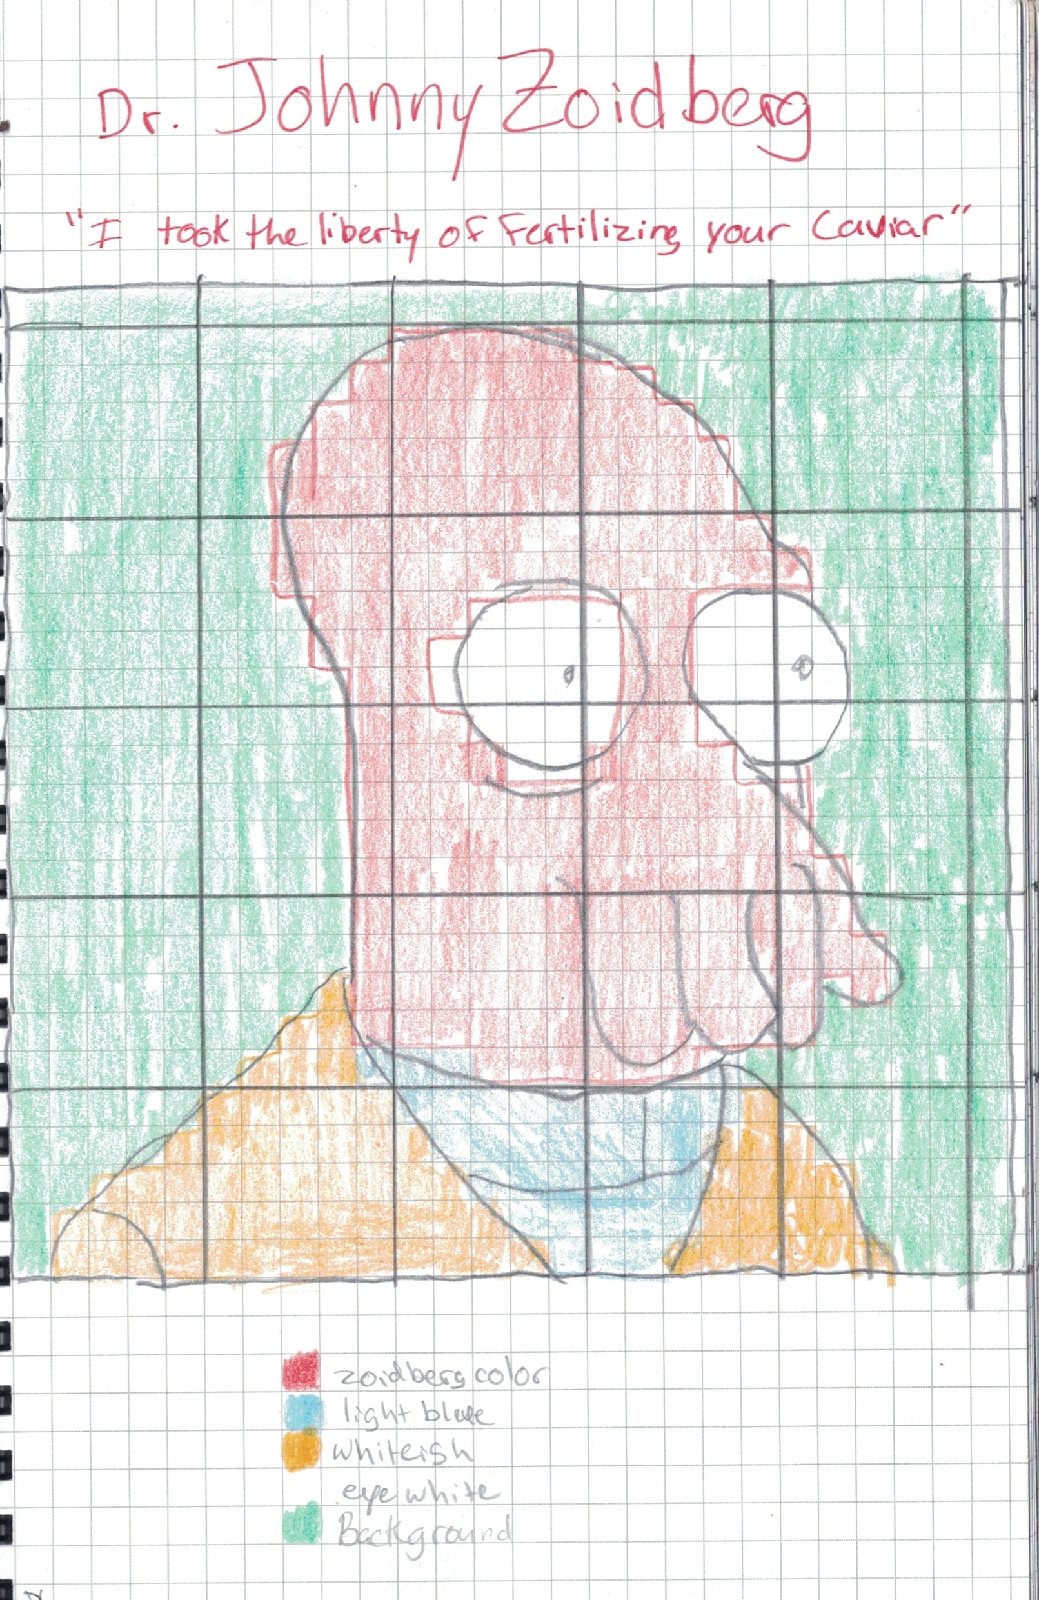
I've decided to share the color patterns I've been following to create the character squares for my Futurama project.  I didn't create these characters, I just made them pixilated to fit in a square that is 26 stitches by 26 stitches.  When I crochet these squares using a 3.5mm hook they end up being close to a 5 inch square.  I am going to combine 20 character squares with a large Planet Express back patch.  The front will feature folded lapels and pockets (of course), and a spot for a name tag so it looks like a crew jacket.  I am also going to add poofs to the top of the shoulder where the body and sleeves meet as a nod to Futurama 's totally un-cool futuristic trends (you can't admit they're cool, that's totally not cool).  

So without further adu, here is the first of the characters I am sharing, the Planet Express Crew!  Keep in mind, I hand drew these in a notebook and wasn't intending on sharing them, so theyre a little rough. Fry doesnt have the colors listed on the bottom as the other characters do, but you can figure it out, you smarty pants. My handwriting is messy,  it was colored in with art supplies I stole from my kids while they were sleeping, Fry's page had a nacho stain I cropped out. But, hey,  they're free! I am creating them as I go, so I will share them in groups on this blog.  Please subscribe to be the first alerted when I update and share more. Take a screenshot or right click on the image to download. 

The charts are all 26 squares by 26 squares, guidelines drawn every 5 squares. Each square is a stitch, I crocheted the main colors and embroidered the black outline over the colors when completed. 

Fry
Leela
Hermes
Professor
Bender

Zoidberg
Scruffy 

Here is the crocheted version of Fry following just the color chart above:


And here's Fry after the outline is embroidered on:

Good luck creating your very own Futurama squares! Stay tuned & subscribe to see the next character squares, and to see my final project come to life! 


Friday, November 11, 2016

Turkey Peacock

Peacock Crochet From Turkey Pattern

I wanted to make a peacock motif that was about the size of my hand but I couldn't find any free patterns to make one.  I saw a LOT for Turkey motifs though, that time of year I guess.  Then I thought, I could just change the colors of a turkey pattern to make it into a peacock!  I found a really cute free turkey patterns for a coaster and thought the size would be perfect for what I'm envisioning.

http://www.craftpassion.com/crochet-turkey-coasters-and-ornaments.html

But as I was crocheting my turkey-turned-peacock, something just wasn't looking quite right.  I don't know if it was the colors, the size, or whatever.  Something was just... off.

Then I decided to just wing it and make up my own pattern based off of the one above and make a peacock myself.  I was surprised, it came out really nice and I'm rather proud-as-a-peacock! 


The other motif that I was originally working on did not go to waste.  My very cute son decided it was great for playing peek-a-boo. 

So here's the pattern that I created, based off of the Turkey Coaster pattern from CraftPassion.com


Peacock Motif 
5MM H Hook used with Red Heart Worsted weight yarn
Ch - Chain
SC - Single Crochet
DC - Double Crochet
HDC - Half Double Crochet
Sl - Slip Stitch
All terms are in US Crochet terms

Body
Round 1 (Royal Blue)
Magic circle, Chain 3, DC 14, sl to join top of ch3. (15 stitches)
Round 2
Ch2, HDC in same starting stitch, 2HDC in each stitch around. sl to join top of ch2. Fasten off. (30 stitches)

Neck & Head
Round 1 (Royal Blue)
Magic circle, ch 3, DC 7, sl to join top of ch3 (8 stitches)
Round 2
Ch7, DC in 3rd loop from hook, DC, HDC, HDC, HDC, sl to join stitch on head. Fasten off. 

Tail
Round 1 Tail (Purple)
Start on body at any stitch. Ch3, DC in same starting stitch, ch 1, 2DC in same starting stitch, skip 2 stitches on body. *2DC, ch1, 2DC, skip 2 stitches on body* Repeat between * until you have 6 sets, Fasten off. 
Round 2 Tail (Turquoise)
Start at ch1 space from round 1 tail, ch3, DC in same starting stitch, ch1, 2DC in same starting stitch, skip 2 stitches on body. *2DC, ch1, 2DC in next chain space* Repeat between * until you reach the end. Fasten off. 
Round 3 Tail (Light Green)
Start at ch1 space from round 2 tail, ch3, 2DC in same starting stitch, ch1, 3DC in same starting stitch, *3DC, ch1, 3DC in next chain space* Repeat between * until you reach the end. Fasten off. 
Round 4 Tail (Teal)
Start at ch1 space from round 1 tail, ch3, 6DC in same starting stitch, *7DC in next ch space* Repeat between * until you reach the end. Fasten off. 

Weave in all ends. Attach neck to body in the best place necessary for the peacock look. Repeat entire process again to make a total of two peacocks (or if you wish, you can make the second one in one solid color).  Put both WRONG sides together, hiding all the ends and scraps, line up the edges and attach as follows:


Attaching Front & Back
Side edge of the tail (Grey)
*1SC (at the corner to the tail and go through both layers), ch1, repeat between * until you reach the body, continue to Body & Feet
Body & Feet
SC in next 4 stitches, [make foot: ch2, *ch2, SC on 2nd chain from hook, sl stitch to 2nd next chain, repeat between* 3 times, SC on next st, SC in the same stitch of last SC before making foot], SC in next 2 stitches, repeat make foot, SC in next 4 stitches. continue to Side Edge of Tail
Side Edge of Tail
*ch1, 1SC, repeat * until you reach the corner of the tail. continue to Top of Tail Outline & Joining
Top of Tail Outline and Joining
*SC in next 7 stitches. SC in between the 2 shells.Ch1, SC around the row below (Round 3 Tail Light Green)Ch1, SC around row Round 2 Tail TurquoiseCh1, SC around row Round 1 Tail Purple 
Ch1, SC into one of the skipped stitches on the body. 
Turn to go back up the peacock tail now
Ch1, SC around row Round 1 Tail Purple 
Ch1, SC around row Round 2 Tail Turquoise
Ch1, SC around row Round 3 Tail Light Green*
Repeat between * until you reach the end. Sl to join starting stitch, fasten off. 

You may now add a securing stitch to the peacock's head to keep it in place if you wish. 

That's it!  Please enjoy your peacocks!  I will be making mine for a mobile for my new baby's nursery. 

Saturday, March 21, 2015

Diamond Bobble Baby Blanket

As many of you already know, Dan and I will be adding an addition to our family this August.  My mother was always the baby blanket master in my family, but I figured since she's not here to make the blanket herself, I'd make it this time. I learned a new stitch, used my mother's yarn from her old stash.. it was going to be really special. After I started the pattern, I realized it eats yarn like crazy, and I was quickly running out. I only had a few rows done and would only have enough to make a few more. I was so disappointed, there was no more in her yarn bundle, and no paper to say what brand or what color it was. All I knew is it was worsted weight and an acrylic blend. The other day I walked into a yarn store expecting to be disappointed and expecting to hop from store to store searching for it... but I found it RIGHT AWAY! It was Lion Brand Pound of Love in Pastel Green. You have no idea how elated I was when I found it, I almost broke into song at the store. I'm so glad Lion Brand continues to make an awesome product that has been enjoyed by many generations, and will be enjoyed for generations to come!

In the picture below, what's already done is from my mother's yarn, and the new skein is above it ready to be made into whatever! I may even have enough leftover to make a matching hat and mittens!


After sharing my story on Lion Brand's Facebook page, many many people commented commending me for carrying on my mother's talent, and complimented my choice of color and pattern.  Many people asked me for the pattern, so I figured I'd write one up! 

The original stitch is from 101 Stitches For Afghans by Jean Leinhauser, put forth by the American School of Needlework, this pattern was #74 out of 101.  I got my copy from Amazon, used for about $3. Here's a link to get your own copy: www.amazon.com/101-Stitches-Afghans-Jean-Leinhauser


This pattern is fairly easy, if you can do the Single Crochet (SC), Double Crochet (DC), and a Triple Crochet, you will have no problem creating this blanket.  It may look like an intimidating pattern at first, but once you get a few rows done, you'll be surprised at how simple it is. 

Materials
Worsted Weight Yarn (I used Lion Brand Pound of Love, in Pastel Green)
Size H hook (5.00 mm)

Stitches Used
ch: Chain
sc: Single Crochet
dc: Double Crochet
Bobble: (Keep last loop of each triple crochet on the hook as you perform the triple crochet stitches) 5 Triple crochet in chain 1 space 2 rows below, Yarn Over and draw through ALL 6 loops on hook.
I plan on creating a video how-to on the creation of the booble, it took me a few times to get it right. In the meantime, there are plenty of tutorials on YouTube or Pinterest.

Feel free to message me if you're having any issues with this pattern, I will try my best to explain further. 

Instructions
Foundation chain: 150 chains (Any multiple of 12, then six extra stitches will work)

Row 1: (Right side) 
Sc in 2nd chain from hook and in next chain; *ch 1, skip next ch, sc in next 11 chs; repeat from last * until you get to the last 3 chains. ch 1, skip next ch, sc in next 2 chs. Ch2 (counts as first dc on following rows), turn.

Row 2: 
Dc in next sc (remember the ch 2 counts as the first dc, so youre basically skipping the first sc here), *ch 1, skip over ch 1 space, dc in next 11 stitches; repeat from * until you reach the last ch 1 space. Ch1, skip over ch 1 space, dc in last sc. Ch 1, turn. 

Row 3: 
Sc in first dc, Bobble (in ch 1 space on 2nd row below), back to the working row, sc in next dc; *ch 1, skip next dc, sc in next 7 dc, ch 1, skip next dc, sc in next dc, bobble (in ch 1 space on 2nd row below), back to the working row, sc in next dc.  Repeat from * to turning ch2, sc in 2nd ch of turning ch2. Ch2, turn. 

Row 4: 
Dc in next 3 stitches; *ch 1, skip ch1 space, dc in next 7 stitches, ch 1, skip next ch 1 space, dc in next 3 stitches. Repeat from * until you reach the last sc; Dc in last sc. Ch 1, turn. 

Row 5: 
Sc in frist 4 dc. *Bobble (in ch 1 space on 2nd row below), back to the working row, sc in next dc, ch 1, skip next dc, sc in next 3 dc, ch 1, skip next dc, sc in next dc, Bobble (in ch 1 space on 2nd row below), back to the working row, sc in next 3 dc.  Repeat from * until you reach the turning ch2, sc in 2nd ch of turning ch.  Ch 2, turn. 

Row 6: 
Dc in next 5 stitches,*  ch 1, skip ch1 space, dc in next 3 stitches, ch 1, skip next ch1 space, dc in next 7 stitches. Repeat from * to last 2 ch1 spaces, ch 1, skip next ch1 space, dc in next 3 stitches, ch 1, skip next ch1 space, dc in next 6 stitches. Ch 1, turn. 

Row 7: 
Sc in first 6 dc, *Bobble (in ch 1 space on 2nd row below), back to the working row, sc in next dc, ch 1, skip next dc, sc in next dc, Bobble (in ch 1 space on 2nd row below), back to the working row, sc in next 7 dc.  Repeat from * to last 2 ch1 spaces. Bobble (in ch 1 space on 2nd row below), back to the working row, sc in next dc, ch 1, skip next dc, sc in next dc, Bobble (in ch 1 space on 2nd row below), back to the working row, sc in next 5 dc, and in 2nd ch of turning ch2. Ch 2, turn. 

Row 8: 
Dc in next 7 stitches, skip next ch 1 space, * dc in next 11 stitches, ch 1, skip next ch 1 space.  Repeat from * to last 8 stitches, dc in last 8 stitches. Ch 1, turn. 

Row 9: 
Sc in first 6 dc, ch 1, skip next dc, sc in next dc, * Bobble (in ch 1 space on 2nd row below), back to the working row, sc in next dc, ch 1, skip next dc, sc in next 7 dc, ch 1, skip next dc.  Repeat from * to last ch1 space on 2nd row below, Bobble (in ch 1 space on 2nd row below), back to the working row, sc in next dc, ch 1, skip next dc, sc in next 5 dc and in 2nd ch of turning ch2. Ch 2, turn. 

Row 10: 
Repeat row 6

Row 11: 
Sc in first 4 dc, * ch 1, skip next dc, sc in next dc, Bobble (in ch 1 space on 2nd row below), back to the working row, sc in next 3 dc, Bobble (in ch 1 space on 2nd row below), back to the working row, sc in next dc, ch 1, skip next dc, sc in next 3 dc. Repeat from * to turning ch2; sc in 2nd ch of turning ch2. Ch 2, turn. 

Row 12: 
Repeat row 4

Row 13: 
Sc in dirst 2 dc, ch 1, skip next dc, sc in next dc, * Bobble (in ch 1 space on 2nd row below), back to the working row, sc in next 7 dc, Bobble (in ch 1 space on 2nd row below), back to the working row, sc in next dc, ch 1, skip next dc, sc in next dc. Repeat from * to turning ch2, sc in 2nd ch on turning ch2. Ch 2, turn. 

Row 14:
Repeat row 2

Repeat rows 3 to 14 until you've reached your desired length. 

Last Row: 
Sc in first dc, *Bobble (in ch 1 space on 2nd row below), back to the working row, sc in next 11 dc. Repeat from * to last ch 1 space on 2nd row below, Bobble (in ch 1 space on 2nd row below), back to the working row, sc in next dc and in 2nd ch of turning ch2. 
Finish off. 

I hope you enjoy this pattern and have as much fun making your project as I am with my baby blanket. I plan on adding a ruffled border to the blanket once I have it at the size I like.  Stay tuned for that pattern, and for the video tutorial on the bobble stitch. Good luck!  

Thank you for reading and checking out my blog! As a cute bonus, here's a picture of my dog, Henrik using my crochet book as a pillow while he takes a snooze...


Happy Hooking!
~The Craftmeister


Wednesday, October 8, 2014

Skywalker Boots

The internet is one of the best craft tools around. Some days I think to myself, "Hmm, I wonder how to crochet a heart..." A few clicks on google later and ...bam! Crochet heart. 


"Hmm, I wonder how to crochet a flower..." 


"What about an owl...?"


It usually works for a lot of things I search.  But of course, the one time I need to find a free pattern for booties, I can't find one in the right size. I ended up making up my own based on a pattern I found for a larger size bootie.  I found this Toddler Double Soul Moccasins Pattern pattern for toddlers and kids, they are about 6.5" in length. The kid I'm making the booties for is barely 12 months old, and his foot measured 5 inches.  So here's the pattern if you need to make one for your little one! 

I made the pattern almost exactly like the one in the link above, but smaller. I also changed the shaft of the bootie a little, I wanted my booties to look wrapped, like Luke Skywalker's boots in Star Wars. My stitches are in US terms.  And I use the typical pattern short hand.

For example, SC # means to crochet one 'single crochet' in the next number stitches. And # SC means to crochet # 'single crochet' in next stitch. Please let me know if you have any questions, this is my first time writing a pattern...

Stitches used: 
SC Single Crochet
DC Double Crochet
HDC Half Double Crochet 
sl st Slip Stitch
ch Chain
SC2TOG Single Crochet two stitches together 
DC#TOG Double Crochet # of stitches together 

Worsted weight yarn, Size G6 hook (4.00 mm)

In sole color (I used Red Heart Coco Bean), slipstitch, chain 13.
Round 1: 2 SC in 2nd loop from hook, SC 5, HDC, DC 4, 7 DC in last chain, working opposite side of starting chain DC 4, HDC, SC 5, 2 SC in last chain, sl st to first stitch
Round 2: ch 1, SC, 2 SC, SC 9, (HDC, 2HDC) x4, HDC, SC 10, 2 SC, SC, sl st join to first sc
Round 3: ch 1, 2 SC, SC, 2 SC, SC 11, HDC, SC 11, 2 SC, SC, 2 SC, sl st join to first sc
Round 4: ch 2, 2 DC, 2 DC, HDC 14, (DC, 2 DC) x3, (2 DC, DC) x3, HDC 14, 2 DC, 2 DC, sl st join to first DC

If you are doing the contrasting side double sole, fasten off. Make another sole in boot color and continue the pattern below...

Round 5: Stitch both soles together, carefully keeping them straight, using SC. ~58 stitches
Round 6: HDC in each stitch all around, should end with 58 stitches in total, decrease or add where ever if you need to
Round 7: DC in each all around, 58 stitches

Round 8: ch1, SC 21, SC2TOG, HDC, DC2TOG x5, HDC, SC2TOG, SC 21, sl st join to first
Round 9: ch 1, SC 17, SC2TOG, DC2TOG, DC3TOG, DC2TOG, DC, DC 2, DC2TOG, SC2TOG, SC 17, sl st join to first st
Round 10: SC 13, SC2TOG, DC2TOG, DC, DC3TOG, DC, DC2TOG x2, SC2TOG, SC 13, sl st join to first st
Round 11: SC 6, SC2TOG, HDC, DC2TOG, DC, (DC2TOG, DC) x4, DC2TOG, HDC, SC2TOG, SC 6

That's it for the shoe part, the next part of the boot is just 5 rows of double crochet.  I slightly modified the boot shaft from what I saw in the tutorial I looked at when creating my pattern.  I did 5 rows of double crochet then one last row of single crochet in a lighter beige color for some contrast.  I think I get the Luke Skywalker effect with these boots, the texture of the stitches help it looked wrapped.  I'm pretty happy with how they came out!  I hope you enjoyed the pattern.  Here's some fashion photos of the booties, I got inspired... 


AND you could fold down the booties for a different look!

...for those fashionista babies

Thanks for checking out my first pattern!  I hope you have as much fun making yours as I did! 

Stay tuned for more pictures of the Star Wars twins costumes updates! 

TTFN
~The Craftmeister